User Guide-DS-C02 Docking Station
Compatible system & Download driver step

Widely compatible with the following systems:
Support Windows, macOS, Android, ChromeOS, Ubuntu systems.
Please must make sure that your laptop‘s USB-C port support power delivery and alt-mode display, or this docking station is not compatible with your laptop. So before purchase, please must confirm your laptop must have full-featured USB Type-C port or Thunderbolt 3/4 port.
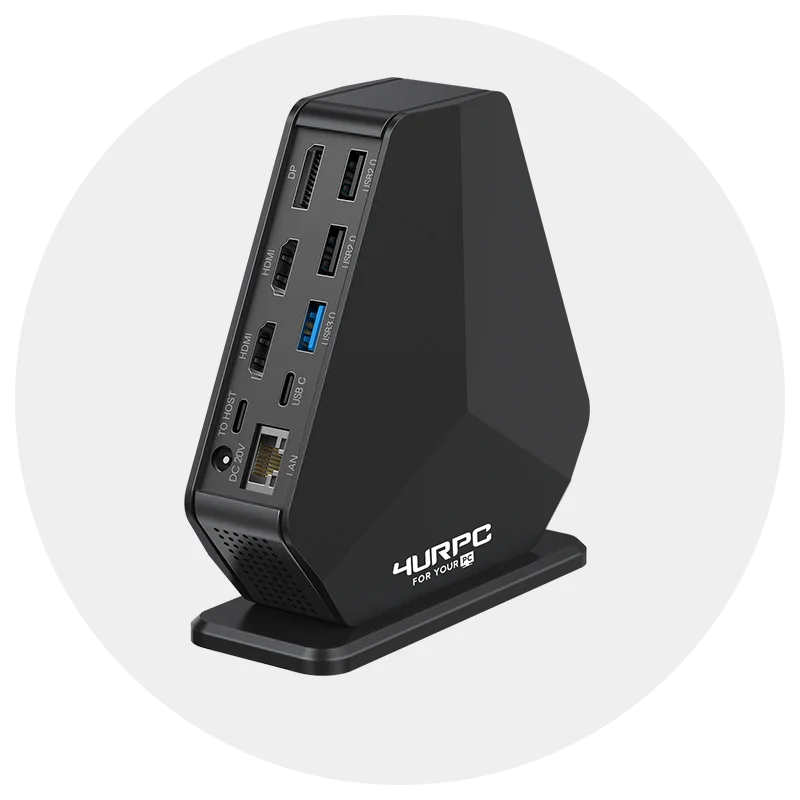
DSC02 is a driver-based docking station. The bottom HDMI is plug and play via USB C Alt, and the top HDMI and DP port are work based on the USB 3.0 driver. Please download the drive from "DisplayLink" before use.
Download driver Link: https://www.displaylink.com/downloads

How to Install DisplayLink manager app to extend triple monitors?
Step 1: Search “DisplayLink” on Chrome (such as Google)
Step 2: Choose a proper operating system according to your laptop
Step 3: Click the “download” and install
Step 4: Set up the resolution and enjoy
How to set the Extend Mode and Mirror mode
Extend Mode:
macOS: Navigate to Apple Menu->About This Mac->Display->Arrangement->Click Cancel Mirror Displays
Windows: Please click Intel Graphics Setting for multiple displays setting or hot key: Window + P
Mirror Mode:
macOS: Navigate to Apple Menu->About This Mac->Display->Arrangement->Check Mirror Displays
Windows: Windows laptop does not support three external monitors to mirror the laptop screen at the same time
How to Use the new DisplayLink Manager App
we recommend proceeding with following steps to install and use the new DisplayLink Manage App. They are to be followed once after installing the app.
1.1 First, uninstall the classic DisplayLink driver if you have it on your computer.
1.2 Download the DisplayLink Manager App and install it from the ZIP file.
1.3 Navigate in Finder to Applications and then open DisplayLink Manager App.
1.4 Click on the DisplayLink Manager app icon from the notification area to open the app window, select "Launch automatically after logging-in" for the software to start automatically every time you log-in.
1.5 Also you can go to the support page and check more details about the DispalyLink Manage App
1.6 Now connect the peripheral with DisplayLink technology and navigate to your System Preferences to open Security & Privacy
1.7 Enable "Screen Recording" to allow the DisplayLink Manager app to capture pixels and send them to your USB C peripheral: Please select "Privacy" tab -> Navigate to“Screen Recording" in the list on the left -> Then tick the“Screen Recording" permission for DisplayLink Manager.NOTE: The DisplayLink Manager does not store or record any screen content.
1.8 Because the new permission will only be active the next time you start the application, macOS will invite you to “Quit & Reopen". in Catalina 10.15.x please select "Quit Now". Please accept.
1.9 Now it has adequate permissions, re-open DisplayLink Manager from Applications in the Finder. On macOS Big Sur application will restart automatically.
1.10 Your displays are now working properly.
DisplayLink Support
https://support.displaylink.com/
The Synaptics provides this support portal to try and answer common questions you might have about DisplayLink technology. lf you still need help, please don't hesitate to let me know via support@4urpc.com